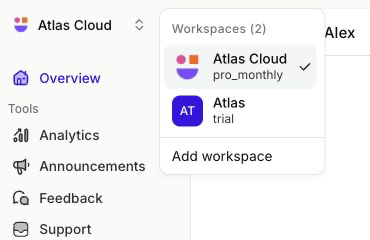
Switch to the workspace whose data, plan, and subscription you want to use.
The check icon marks your current workspace.
The mobile menu also uses a check icon to mark the current workspace.
Seeing an expired trial instead of your paid account? You may be viewing a different workspace. Open the workspace menu and select the workspace that owns the paid subscription. Plans and subscriptions are managed separately for each workspace.
Switch workspaces on desktop
- Go to the top of the left sidebar. If the sidebar is collapsed, hover over it or move keyboard focus to it to expand it.
- Select the name of your current workspace.
- Under Workspaces, find the workspace you want to open.
- Select the workspace name. Userorbit reloads the page with that workspace selected.
The check icon marks your current workspace.
Switch workspaces on mobile
- In the top bar, select the current workspace name beside the navigation button.
- Under Workspaces, select the workspace you want to open.
The mobile menu also uses a check icon to mark the current workspace.
Confirm the workspace's plan
After switching, go to Settings → Billing. This is the reliable place to confirm the selected workspace's current plan, trial, and subscription details.Note: The plan text in the workspace menu may use an internal billing label and does not show whether a trial has expired. Identify a workspace by its name, then verify its status under Settings → Billing.